↓
 

Huntsville Brick Stone

Brick & Stone Masons in Huntsville, AL

Huntsville Brick Stone
  • Home
  • Brick Masonry
  • Stone Masonry
  • Indoor Fireplaces
  • Outdoor Fireplaces
  • Custom Tile Showers
  • Retaining Walls
  • Gallery
Home→Tags stone 1 2 >>

Tag Archives: stone

Post navigation

← Older posts

When Stone Masonry Needs Weep Holes, Flashing, or Better Drainage

Huntsville Brick Stone Posted on June 26, 2026 by HuntsvilleBSJune 25, 2026
Stone masonry wall construction showing drainage components, flashing details, and moisture management behind stone veneer

Whether stone masonry needs weep holes depends entirely on which kind of stone wall you built. Stone hides its drainage better than brick does, so the parts that keep it dry are the first things crews skip. Get those details right and the wall lasts for decades. Guess at them and the wall can rot from behind while the face still looks perfect. The fix is matching the moisture details to the wall type, because the two common stone systems follow completely different rules.

First Figure Out Which Stone Wall You Have

There are two ways stone goes on a house. They look similar from the street. They don’t drain the same way at all.

The first is full-bed anchored veneer. This is real, full-thickness stone with an air gap behind it, tied back to the wall with metal anchors. It’s heavy and thick. Water gets into that gap and needs a way out.

The second is adhered veneer. This is thin stone, either real or manufactured (also called cultured stone), stuck flat to a backer with mortar. There’s no air gap. Code draws the line by weight and thickness: adhered veneer tops out at 15 pounds per square foot and 2 and five-eighths inches thick. Anything heavier or thicker has to be built as anchored stone. Most new homes use the thin or manufactured kind, and that’s the kind that fails most.

When Stone Needs Weep Holes

Weep holes belong on the full-bed anchored kind. That air gap behind the stone makes it a drainage wall, the same idea as a brick veneer. Water that gets behind the stone drains down onto flashing and has to exit somewhere. Weeps at the base, sitting just above the flashing, are that exit. You also want them above windows and doors.

Stone hides its own trap. The cavity is out of sight and the wall looks solid, so crews leave the weeps out and nobody notices. Then water pools on the flashing with nowhere to go and backs up into the wall. The thin and manufactured kind doesn’t get classic weep holes at all, because it has no cavity. It drains a different way.

When Stone Needs Flashing

Both kinds need flashing. Flashing goes anywhere water can slip behind the stone and needs a path back out: the base of the wall, above windows and doors and where a roof meets a wall. On anchored stone, the flashing works with the weeps as a pair. On adhered stone, the flashing at the base is usually a weep screed, which is a metal strip along the bottom that lets trapped water drain out and drip clear. Leave the flashing out and any water that gets in heads straight for the framing.

When Stone Needs Better Drainage Behind It

This is where most stone walls fail. Thin and manufactured stone over wood framing needs a drainage layer behind it. Stone packed straight against the wall traps water with nowhere to go. The 2021 code now requires a drainage gap behind adhered veneer, plus a water barrier at least as good as two layers of building paper. The wall rots from behind while the stone face looks fine for years.

Clearance to the ground matters just as much. The bottom of the stone and its weep screed have to sit at least 4 inches above soil and 2 inches above paving. Stone run straight down into a flower bed or onto the dirt is the most common way manufactured stone fails. The barrier wicks up ground moisture, the stone stays wet and the wood behind it gives out.

A Quick Way to Decide

Match the detail to the wall before anyone sets a single stone. The system you chose decides which details you need. Run this list first.

  • Full-bed anchored stone with an air gap gets weep holes at the base above the flashing, plus weeps above openings.
  • Thin or manufactured stone on framing skips the weep holes but needs a drainage gap and a water barrier behind it.
  • Either kind gets flashing at the base, over openings and where the roof meets the wall.
  • Adhered stone gets a weep screed at the bottom, kept at least 4 inches above soil and 2 inches above paving.
  • No stone of any kind should run down into soil or a planting bed.

Why Builders Get This Wrong

Stone covers its own tracks. You can’t look at a finished wall and tell whether the drainage was done right, and manufactured stone looks identical whether it met code or not. The failure shows up years later as soft framing or rot behind the stone, long after the buyer moved in. By then the only fix is pulling the stone off and starting over.

Doing it right at install is cheap. A drainage gap, a proper water barrier and a few inches of clearance cost almost nothing while the wall is open. Skipping them buys one of the most expensive callbacks in all of residential cladding. For a builder, this is an easy place to save real money by doing it once, correctly.

Frequently Asked Questions

Does all stone veneer need weep holes?

No. Only full-bed anchored stone, the kind with an air gap behind it, needs weep holes. Thin and manufactured stone has no cavity, so it drains through a gap and a weep screed instead.

What is a weep screed and when does stone need one?

A weep screed is a metal strip along the bottom of the wall that lets trapped water drain out and drip away. Adhered and manufactured stone over framing needs one at the base. It works as the drainage exit for that kind of wall.

Why does manufactured stone rot the wall behind it?

It usually traps water. When the stone is packed tight to the sheathing with no drainage gap or a weak water barrier, moisture sits against the wood and can’t dry. Over time the framing rots while the stone face still looks fine.

How far should stone sit above the ground?

The bottom of the stone should stay at least 4 inches above soil and 2 inches above paved surfaces. Running stone down to the dirt lets it wick up ground moisture. That single mistake causes a large share of stone wall failures.

Does thin stone over framing need a drainage gap?

Yes. Current code requires a drainage space behind adhered veneer, along with a water barrier equal to at least two layers of building paper. The gap gives water a way down and out instead of into the wall.

Posted in Stone Masonry | Tagged stone

Stone Masonry Steps That Add Curb Appeal Without Looking Overbuilt

Huntsville Brick Stone Posted on June 25, 2026 by HuntsvilleBSJune 25, 2026
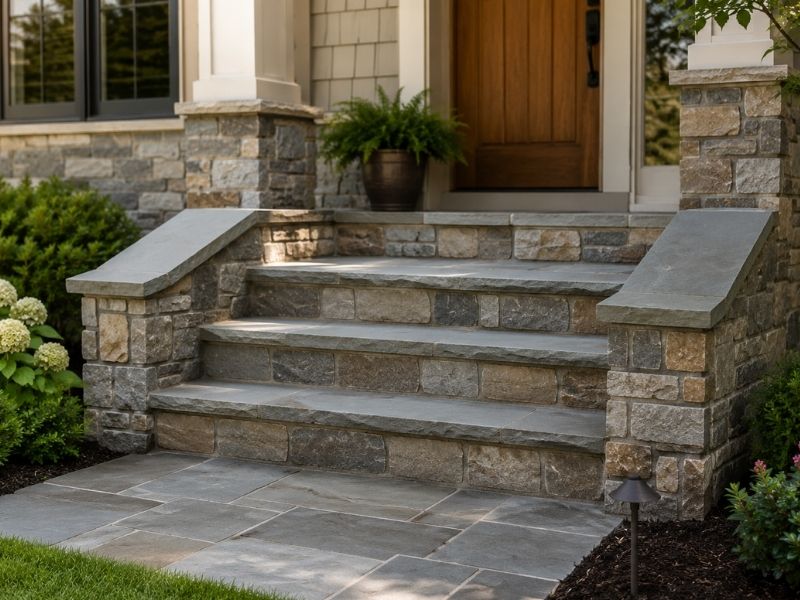
Well-proportioned stone masonry steps leading to a home entrance with balanced design and natural curb appeal

Stone steps can make an entrance look custom, or they can look like a fortress someone dropped on the front lawn. The line between the two is thinner than most builders think. Good stone masonry at the front door reads as quiet and expensive. Overbuilt stone reads as heavy and try-hard. The difference comes down to a few choices about size, proportion and material, and none of them cost more to get right.

Overbuilt steps share a look. Everything is too big. The treads are massive, the walls flanking the steps are too tall and the stone caps are thick and chunky. Piers the size of mailboxes guard a normal front door. The steps stop being an entrance and turn into a monument. Heavy proportions don’t read as grand. They read as a builder who didn’t know when to stop.

Scale the Steps to the House

The mass of the steps has to match the size of the house. A modest one-story home gets swallowed by a wide, grand stone staircase. The steps end up bigger than the thing they lead to, and the whole front looks off.

Match the width of the steps to the door and the porch, not to the entire front of the house. Keep any walls beside the steps low. The entrance should feel open, not walled in. Let the house stay the main event and let the steps lead you to it.

Get the Step Proportions Right

People feel a good step before they notice the stone. Comfortable steps read as quality on their own. Code sets the limits here. The riser, which is the vertical part, can be at most 7 and three-quarter inches. The tread, the part you step on, has to be at least 10 inches deep.

Those are the maximums and minimums, not the targets. A front entrance feels best when you go lower and deeper. Aim for a riser around 6 inches and a tread around 13 inches. A handy check is the comfort rule: two risers plus one tread should land between 24 and 25 inches.

One more thing matters more than people expect. Keep every riser the same height. Code allows only a 3 eighths inch difference across a flight, and your foot catches anything bigger right away. Even risers look intentional. Uneven ones look like a mistake.

Let the Stone Be Quiet

Restraint in the material does most of the work. Pick one stone, not three. Choose a natural, muted color that goes with the front of the house instead of fighting it. Busy blends and high-contrast patterns pull the eye for the wrong reasons.

Echo something the house already has. If the foundation or a porch pier shows stone, match it or stay close. Keep the mortar joints tight and even instead of fat and sloppy. Quiet stone reads as expensive. Loud stone reads as a kit from the home center.

Get the Look Without the Mass

This is the part that saves money. Solid stone steps are heavy. They need big footings and a lot of material, and the cost climbs fast. You don’t need them.

A stone veneer over a poured concrete or block core gives the same face for far less. The core carries the load. The stone shows where people actually see it. You get the custom look without overbuilding the structure or the budget, and most people can’t tell the difference from the sidewalk.

A Quick Gut Check Before You Build

Run through these before the first stone is set.

  • Match the step width to the door and porch, not the whole front of the house.
  • Keep any side walls low so the entrance stays open.
  • Aim for a riser near 6 inches and a tread near 13 inches.
  • Keep every riser within 3 eighths of an inch of the others.
  • Pick one stone and one muted color that echoes something on the house.
  • Build over a concrete or block core to get the look without the mass.

Why Restraint Sells

Overbuilt stone steps don’t add the value builders expect. They cost more, they date quickly and they can make a house look smaller by comparison. A house that has to compete with its own front steps loses.

Restrained steps do the opposite. They read as custom and they don’t go out of style. They let the house sell itself instead of shouting over it. For a builder, the quiet version is usually cheaper and more appealing at the same time. That combination is rare, so take it when you can get it.

Frequently Asked Questions

What makes stone steps look overbuilt?

Overbuilt steps are out of scale with the house. The treads, side walls and caps are too big, and tall piers crowd a normal door. The stone ends up competing with the home instead of leading to it.

How wide should front stone steps be?

Match the width to the front door and the porch, not the whole face of the house. Steps that span the entire front look heavy on a normal home. The entrance should feel in proportion with the door it serves.

What riser and tread size feels best for entrance steps?

Code caps the riser at 7 and three-quarter inches and sets a 10 inch minimum tread. For a gracious feel, go lower and deeper, near a 6 inch riser and a 13 inch tread. Keep every riser the same height so the steps feel even underfoot.

Do stone steps have to be solid stone?

No. A stone veneer over a concrete or block core gives the same look for far less weight and cost. The core handles the load while the stone provides the finished face.

Does one stone color look better than a blend?

Usually, yes. One stone in a muted color reads as calm and custom. Busy multi-color blends tend to look loud and draw attention for the wrong reasons.
Posted in Stone Masonry | Tagged stone, stone mason, stone masonry

Common Problems That Shorten the Life of a Stone Patio

Huntsville Brick Stone Posted on June 19, 2026 by HuntsvilleBSJune 16, 2026
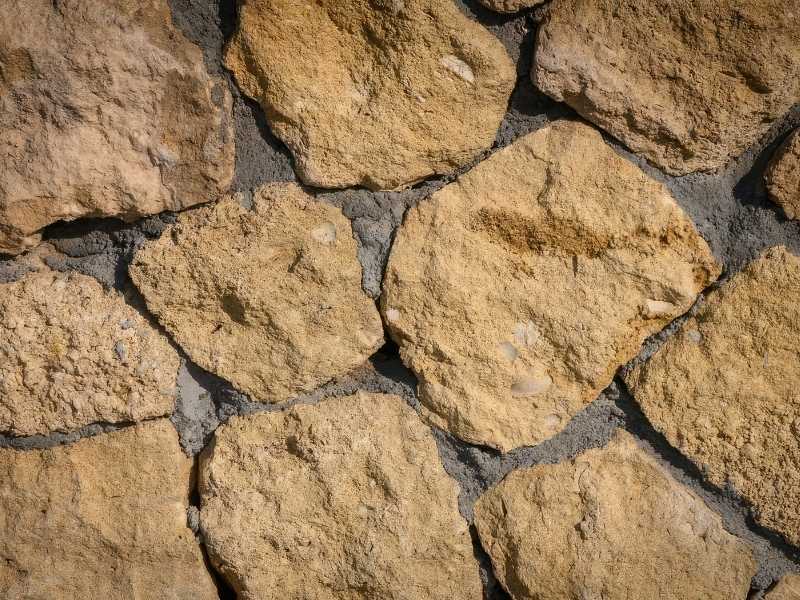
Natural stone patio with irregular stone pavers and visible joints that require proper maintenance for long-term durability.

A stone patio can last 25 years. Most don’t. They crack, shift, and sink long before that, and the reason is almost never the stone itself.

Common problems that shorten the life of a stone patio start below the surface. The base, the drainage, the joint material. By the time a developer or homeowner sees a cracked slab or a sunken corner, the real damage happened months or years earlier.

This matters a lot in places like Huntsville, Alabama, where clay-heavy soil and seasonal rain cycles put constant pressure on outdoor hardscape. This article covers the top failure points, what causes them, and what to fix at the planning stage before the first stone goes down.

Why Stone Patios Fail Before They Should

Stone is durable. The system holding it in place often isn’t.

A stone patio is only as good as what’s underneath it. Skipping steps on the base or using the wrong setting material is how a 25-year patio becomes a 7-year repair job.

The Madison County area sits on expansive clay soil. That soil expands when wet and contracts when dry. A patio built without accounting for that movement will shift. It’s not a question of if. It’s a question of when.

Common Problems That Shorten the Life of a Stone Patio

Poor Base Preparation

This is the most common failure point by far. A base that’s too shallow or improperly compacted will allow the stone to move.

The standard recommendation from the Interlocking Concrete Pavement Institute is a minimum 4-inch compacted aggregate base for pedestrian areas and 6 to 8 inches for areas with vehicle access. Many residential projects in the Huntsville area don’t hit those numbers.

Clay soil makes this worse. Clay holds water. Water softens the base. A softened base settles unevenly, and that uneven settling is what cracks the stone above it.

The fix is simple but takes time: excavate deep enough, use the right aggregate, and compact in layers.

Wrong Stone for the Load

Not all stone handles weight the same way. A thin flagstone that looks good on a catalog page may not hold up under patio furniture, foot traffic, or a heavy grill station.

Natural stone thickness matters. For patios, 1.5 to 2 inches is the standard minimum for most flagstone types. Anything thinner under consistent load will crack, usually right across the middle of the slab.

Developers who spec stone based on aesthetics alone run into this. Pick the stone for the job first. Adjust aesthetics from there.

Bad Drainage Setup

Water sitting on or under a stone patio causes more damage than almost anything else.

Huntsville averages around 56 inches of rainfall per year, well above the national average. That volume of water has to go somewhere. When a patio has no slope or no sub-surface drainage plan, it goes under the base.

The minimum slope for patio drainage is 1/8 inch per foot away from any structure. Many patios are installed flat. That flat installation is where the water problem starts.

A French drain or gravel drainage layer below the base can keep water from building up during heavy rain events, which are common across the Tennessee Valley from spring through early fall.

Ignored Joint Maintenance

The joints between stones aren’t decorative. They hold the patio together and keep debris, water, and weeds out of the base layer.

Polymeric sand is the current standard for joint fill. It binds when wet and holds firm after it cures. Standard sand washes out over time. When joints empty out, water gets in. Weeds follow. Roots from those weeds push stones apart.

Most patios need joint inspection every 2 to 3 years. Most don’t get it. That neglect is a slow failure that most owners don’t notice until stones start rocking underfoot.

Freeze-Thaw Damage

North Alabama sees more freeze events than people expect. Huntsville averages around 20 to 30 freeze days per year. That’s enough cycles to cause real damage to porous stone and poorly filled joints.

Water in joints or cracks freezes, expands by about 9 percent by volume, and pushes outward. That cycle repeated over multiple winters fractures stone and loosens the base.

Porous stone types like sandstone and some limestone are more vulnerable. Denser stones like granite and bluestone handle freeze-thaw better. Seal porous stone before winter and keep joints filled so water has fewer places to collect.

What Developers Get Wrong at the Planning Stage

Most patio failures are locked in before installation starts.

Spec documents that skip base depth requirements. Budgets that cut aggregate to save cost. Drainage plans that treat slope as optional. These decisions don’t show up as problems on day one. They show up two or three years later, after the project is closed and the client is frustrated.

This is a real pattern on residential development projects across areas like South Huntsville and the Meridian Street corridor, where new construction moves fast and site prep sometimes gets rushed.

The standard ICPI installation specs exist for a reason. Treating them as flexible is how projects come back as warranty issues.

One practical step: require soil testing before base prep begins. Clay content in the soil changes the base depth requirement. Skipping that test is guesswork, especially on lots near Aldridge Creek or other low-lying areas where soil moisture stays high.

How to Spot Damage Before It Spreads

Catching patio problems early keeps repair costs low. Check for these signs:

  • Rocking or hollow-sounding stones when walked on (base failure below)
  • Cracked stones with clean breaks across the middle (load or thin spec issue)
  • Joint material that’s washed out or missing in sections (drainage and weed risk)
  • Water pooling on the surface after rain (slope issue)
  • Stones lifting at the edges (freeze-thaw or root intrusion)

Any one of these caught early can be fixed with targeted repair. Left alone, each one spreads. A rocking stone becomes a sunken section. A missing joint becomes a cracked slab.

Walk the patio twice a year. Spring and fall are the best times, especially after Huntsville’s wet season wraps up in April or May.

Frequently Asked Questions

What are the most common problems that shorten the life of a stone patio?

The top causes are poor base preparation, bad drainage, and neglected joints. A shallow or poorly compacted base allows the stone to shift. Missing joint material lets water and weeds in. Together, these two problems account for the majority of early patio failures seen across North Alabama installations.

How long should a stone patio last in Huntsville, Alabama?

A properly installed stone patio on a well-prepared base should last 20 to 30 years or more. Patios in the Huntsville area that fail in under 10 years almost always have a base or drainage problem that was present from the start, often made worse by local clay soil conditions.

Can a failing stone patio be repaired, or does it need full replacement?

Most early-stage failures can be repaired without full replacement. Lifting individual stones, re-grading the base, and re-filling joints is a standard repair process. Full replacement is usually only needed when the base has failed across a large area or the stone itself is cracked beyond repair.

Does the type of stone affect how long a patio lasts?

Yes. Dense stones like granite and bluestone resist freeze-thaw damage better than porous stones like sandstone or some limestone. Thickness also matters. Stones under 1.5 inches are at higher risk of cracking under normal patio load, especially on Huntsville lots with active clay soil movement.

How do you keep weeds from growing through a stone patio?

Filled joints are the main defense. Polymeric sand, when properly installed and activated with water, creates a firm joint that resists weed germination. Standard sand washes out and leaves gaps. Keeping joints topped up is a low-cost way to prevent a much more expensive repair, particularly in warmer months when weed growth is aggressive across the Tennessee Valley.

Posted in Patio | Tagged stone

Post navigation

← Older posts

Leave a Review on Google

Leave a Google Review

Leave a Review on YELP

Leave a Yelp Review

Leave a Review on Facebook

Leave a Review on Facebook

CONTACT US

© Copyright 2021 Huntsville Brick & Stone
​​​​Huntsville, Alabama ​35803
Phone: (256) 804-0025

Privacy Policy | Terms of Use

Web Development and SEO by:
Southern SEO

↑